Everyone has a lot of ideas for new stuff, as developers we are blessed to be
able to bring some of these ideas to life. More often than not, though, we aim
too high and quit before we even get started because of how daunting a task it
might be. Other times we are doing so much at work already, that we just want a
break.
In any of the cases trying new things will do you good. Try a new language or
technology that excites you. You’ll learn new things that can be used in your
daily job, or at least have fun. If teaching is your thing, there’s also the
benefit of learning how to be a newbie again, which gives you perspective.
Starting something
Starting something is the hardest part, I always fear that I get too invested in
a project that ends up to be a piece of crap. Turns out that a lot of times it’s
when you don’t care if it is crap or not that the best things come into
existence. There’s is an entire conference dedicated to instigate the Ruby
community to build more strange things, because some of them will be great. It’s
called Keep Ruby Weird, check it out.
A good way to start creating things is to think of what you do all day and try
to automate (partly or completely) a small part of it. It’s likely that your
problems will be shared by other people around the world, or at least your
coworkers.
The problem I decided to tackle was the fact that pull requests are forgotten.
This can happen because you lost interest in the project, the project is
deprecated or relocated, etc…
My idea to solve this is described in the README as:
Github Nice Guy is a small Ruby script that fetches the open pull requests for
a given user (or organization) and sends a weekly friendly reminder with links
to them to whoever you think should know about it.
The coolest thing about this project, in my opinion, is that it took less than
30 minutes to get done (the first version at least). This is not because I’m an
awesome developer or have mad typing skills, it’s mostly because it was just a
couple of gems put together in a very shady way that kind of worked most of the
times. But I learnt new things about the Github API (and how awesome it is),
sending mails from a ruby script and integrating ruby scripts with whenever.
There’s nothing really fancy about it, but I got to try new things without a lot
of commitment, and as a bonus got a small service that is now running in my
company.
Conclusion and stuff
The main thing to get from this post (if there is one) is that you should see
the resulting “product” as a bonus, the path to get there is what really counts.
This path can be miles long or inches short, that’s up to you, but building
something that helps you out on what you do everyday is a good way to start
gaining momentum.
Git is so awesome and packs so much power that I could hardly fit it all in a
blog post (or 100 for that matter). What this post will talk about though, are a
couple of ways to extend your git for it to better serve you on your everyday
tasks.
ZSH
This is post is not about ZSH, but it is awesome and you should install it. All
the configs will assume you are using it, but surely there are ways of doing the
same for your shell of choice.
Hub
hub is a command line tool that wraps git in order to extend it with extra
features and commands that make working with GitHub easier.
This is the description taken straight out of the project’s README. Hub is
written by the guys at Github, so it is very much compliant with everything on
the site. As of recently you can install it with Homebrew (non-mac users will
have to compile it manuallly, I believe).
1
brew install --HEAD hub # For the 2.x version
Now you can use hub and all it’s powers. The sane thing to do though, is to
alias git to hub, which works perfectly as hub will delegate all non-hub
commands to git.
Just open your .zshrc and add the alias:
1
alias git='hub'
When you brew install hub you will see that it installs completion files to
you system.
12
zsh completion has been installed to:
  /usr/local/share/zsh/site-functions
If you run echo $fpath on your terminal that path should be there. fpath
stands for functions path and you can store you functions in any directory
listed in fpath. Read more about zsh functions
here.
This will provide auto-complete functionality for all your git needs.
If you are like me, though, and git is the command you use more often (about
30% of the time in my case), you will probably want to alias it to something
shorter, such as g.
1
alias g='git'
So now g maps to git which maps to hub. Great! We have, however,
introduced an issue. Auto-complete is broken. That is because the git auto
completion function is only expecting git or gitk as commands to auto
complete.
You can add g to that set easily enough. Again, open your .zshrc and add
compdef g=git.
You should have everything ready to go.
Git commands
Hub adds some really nice things, but what about those specific commands you
love to use? At some point all of us have added commands as aliases in
gitconfig.
12
[alias]
    ia = add --intent-to-add -A
This is not inherently bad, but it can go out of hand pretty quickly. Moreover,
you don’t really have a lot of scripting power with these aliases. As you might
have guessed by now, there is a better way of doing this and it is so cool that
even some of the builtin commands use this strategy.
The basic idea is that any executable script on you PATH that is named
git-some-name will be available as a git subcommand, which means you could do
git some-name to run the script.
Git is so awesome that it even adds them to git help -a under the title “git
commands available from elsewhere on your $PATH”, which will then power the auto
completion, so that will also work for any command you add.
Going back to our example, there’s a couple of things to do to remove it from an
alias into a command, add a directory to the PATH and create a script on that
directory.
123
mkdir -p ~/dotfiles/git_commands
export PATH="$HOME/dotfiles/git_commands"  # Also add this to you zshrc, to persist it
echo "git add --intent-to-add -A" > ~/dotfiles/git_commands/git-ia
You should now be able to remove the alias from the gitconfig and still be able
to run git ia.
Bonus round
Git will just grab the scripts that follow the aforementioned convention and run
them. That means that as long as the shebang is correctly set, you can write a
script in any scripting language.
Here’s one in ruby:
123
#!/usr/bin/env ruby

puts "Hello"
Just name it git-hello, put it in your git_commands directory and you should
be able to type g hello and have git say “Hello” back.
Adding specific configs for a specific project in vim is actually quite easy.
The first thing you need to realize is that vim doesn’t really have the notion
of a project, so we’ll rely on folder structures and paths.
Setting up the environment
The first thing to do is to call a function to set up our environment whenever
we open vim, open a file on a new buffer or open a new file.
The project-names don’t have to be the same, but I find it makes sense if they
do. And they usually refer to the root directory of the project.
The specific configs
We can the add regular vim configs the project-name.vim config file. Something
that I find useful is to map shortcuts to commonly used directories (kind of a
poor man’s Rails.vim :R).
1
cnoremap %a<C-R>'app/resources/scripts/apps/
Now every time you write %a in the command line it will be replaced with
app/resources/scripts/apps/. So you can just :e %a and auto complete your
way into the file you want.
You can also add other settings such as number of spaces per tab, which may vary
from project to project. It’s as easy as:
If you were expecting a showdown in which I go on to proclaim Ruby (or Rust) to
be the best language ever, you can stop reading now. I have been programming
Ruby for a few years and have only recently picked up Rust. This article serves
to show how much I (do not) know about Rust and how it compares to Ruby in my
point of view.
If you’ve never heard of it, Rust is a language
championed by Mozilla that aims at replacing C++ as the language in which
Firefox in written.
While learning Rust I came across the Rust for Rubyists
book by Steve Klabnik, which I recommend, and on that book there is small
program that shows how to create different kinds of monsters with the same
interface. I tweaked it a bit and implemented it in Ruby as well, so it can be
compared.
classIndustrialRaverMonkeydefinitialize@life=100@strength=20@charisma=10@weapon=50enddefattackputs"The monkey deals #{@strength} of damage"endendclassDwarvenAngeldefinitialize@life=100@strength=50@charisma=70@weapon=50enddefattackputs"The angel deals #{@strength} of damage"endenddefcall_attack(monsters)monsters.each(&:attack)endmonkey=IndustrialRaverMonkey.newangel=DwarvenAngel.newmonsters=[monkey,angel]call_attack(monsters)
We have two monsters each with a set of characteristics and an attack method,
an instance of each of them is created, put into an array and finally they are
given order to attack. The call_attack method is there in order to correctly
replicate the Rust version, it is a bit redundant here.
traitMonster{fnattack(&self);fnnew()->Self;}#[allow(dead_code)]structIndustrialRaverMonkey{life:int,strength:int,charisma:int,weapon:int,}implMonsterforIndustrialRaverMonkey{fnattack(&self){println!("The monkey deals {:d} of damage",self.strength)}fnnew()->IndustrialRaverMonkey{IndustrialRaverMonkey{life:100,strength:20,charisma:10,weapon:50}}}#[allow(dead_code)]structDwarvenAngel{life:int,strength:int,charisma:int,weapon:int,}implMonsterforDwarvenAngel{fnattack(&self){println!("The angel deals {:d} of damage",self.strength)}fnnew()->DwarvenAngel{DwarvenAngel{life:100,strength:50,charisma:70,weapon:50}}}fncall_attack(monsters:&[&Monster]){formonsterinmonsters.iter(){monster.attack();}}fnmain(){letmonkey:&IndustrialRaverMonkey=&Monster::new();letangel:&DwarvenAngel=&Monster::new();letmonsters=[monkeyas&Monster,angelas&Monster];call_attack(monsters);}
The code is similar, but we have something called a trait, another thing
called struct and yes, a main function. Let’s look a bit closer at each of
the differences.
Comparing the implementations
The first and probably more obvious difference is that Ruby does not need an
interface definition, called a trait in Rust, it relies on duck typing. What
that means is that Ruby trusts you not to use a monsters that does not respond
to attack. On the other hand, Rust’s compiler ensures that all the monsters
have that function, throwing an error otherwise. Nothing to fancy here, it’s the
dynamic versus strong typing duality you are probably already aware of.
Even though Rust relies strongly on types, it does have a very good ability to
infer them, as you can see when the monsters variable is assigned on line 52.
Another thing you don’t have with Rust are classes, the way to get something
close to a class is to have a struct, which defines a set of variables, a
trait which defines a set of functions and mixing then with impl TraitX for
StructY.
Still on the topic of traits, you might have noticed that one of the functions
receives &self as a parameter and the other returns Self. Those are the
equivalent to an instance method and initialize in Ruby.
The last difference I find worthy of note is that in Ruby most variables are
pointers to the actual object and you have no control over that. In Rust you
have three differenttypes of pointers,
owned, managed and borrowed. Having programmed in C a few years ago, I
came to fear and respect pointers as the bringers of pain. Pointers in Rust are
much nicer, mostly because of the language philosophy to put safety first,
making it impossible for memory leaks and overflows to pass through the compile
phase. It is also great with concurrency through a couple of constructs called
tasks and channels.
It obvious that the Rust implementation has more code, but it also adds an extra
layer of safety, which you might or might not want.
Good defaults
To be fair, Rust adds two “hidden” features. First, all variables are immutable
by default and you have to make them explicitly mutable if you want.
1
letmutx=1;
Secondly, all functions, structs and traits are private by default, so if I was
to try and use them in another file:
I have been fiddling with Rust for a very small amount of time, but I’m really
liking how conceptually different it is from Ruby. It is a great language to
learn some new ideas, and also to go down a level to where you have to use
pointers.
The call to redraw is not needed if you use gvim, but in terminal vim your
screen will be all messed up unless you do it.
As a bonus you can also define a mapping to call this function easier.
1
nmap <Leader>rl :call ReloadChrome()<CR>
This is as far as Joe went, but I wanted to take it further.
FTPlugin
Vim has an awesome feature called are ftplugins or file type plugins, which are
nothing but config files that are only loaded once you enter a buffer with a
file of a specific type (type :h ftplugins in vim for more info).
I created one for html files, simply by creating a ~/.vim/ftplugin/html.vim
file.
This is just checking if the plugin is already loaded, and if it is not it
defines a command mode abbreviation. In this case I’m redefining :w to :call
ReloadChrome().
The getcmdtype()==':' && getcmdpos()==1 bit makes sure we don’t
substitute any w that we type in a command, just if it the first letter.
A very important part of this code is the <buffer>, which ensures the
abbreviation is only valid for the current buffer.
Now, every time we save an html file, the current tab on chrome will reload.
The extra mile
Since I spend a lot of time developing Rails apps, I thought I could go
a step further and do something more clever than reloading the focused chrome
tab.
For that I wrote a script that reloads a specific URL if there is an open tab with it,
or opens a new tab.
REGEX="^$1.*"osascript &> /dev/null <<CODEtell application "Google Chrome" activate if (count every window) = 0 then make new window end if set found to false set theTabIndex to -1 repeat with theWindow in every window set theTabIndex to 0 repeat with theTab in every tab of theWindow set theTabIndex to theTabIndex + 1 if (do shell script "if [[ \"" & theTab's URL & "\" =~ $REGEX ]]; then echo \"found\"; fi") as text is equal to "found" then set found to true exit end if end repeat if found then exit repeat end if end repeat if found then tell theTab to reload set theWindow's active tab index to theTabIndex set index of theWindow to 1 else tell window 1 to make new tab with properties {URL:"$1"} end ifend tellCODE
Notice that I’m using a regex with the first variable of the script, so that it
works for all paths of a domain, and it can be called from vim like this:
And that’s it, everytime I save a view file, chrome reloads. All of this using
(mostly) vim. Neat.
Pitfalls
For some reason my vim version was running html ftplugins for markdown files.
You can check this by running :scriptnames which gives you a list of all the
files that were loaded, and if there is something like vim/ftplugin/html.vim
you have the same problem I had.
Look for a vim/7.4.253/share/vim/vim74/ftplugin/markdown.vim (or similar),
open it and remove this line runtime! ftplugin/html.vim
ftplugin/html_*.vim ftplugin/html/*.vim.
I’ve lately moved from Cucumber to RSpec features,
and have found the need to test some features that rely on javascript in order to function.
The Basics
This is very easy to do with capybara-webkit, you just need to add one line to your spec_helper:
1
Capybara.javascript_driver=:webkit
And a little magic flag on your RSpec example:
123
it"does something",js:truedo...end
However, I have found myself in situations where, for a specific test, I want to
use the selenium driver. The reasons can go from capybara-webkit not behaving
like the real browser to, more commonly, me being on a debug mission and wanting
to see it rendered on the browser.
Dynamic driver
To solve this problem I came up a solution that allows me to dynamically choose
the driver I want for a given example.
I just added this snippet of code to my spec_helper:
One of the hottest topics of the moment in the rails community is application
design or architecture. There is an obsession (a good one, I think) with clean,
decoupled code, that is easy to maintain and extend. This has led to things such
as presenters, service objects, to some extent even rails concerns.
This is all fine and dandy, but I believe that in order to get closer to that
utopic dream of the perfect system, more drastic and profound changes must
happen. We need an architectural change, that shakes the foundations how we
approach the writing and thought process of a rails application. To this, Uncle
Bob has called the Clean Architecture.
The main igniters of this idea and therefore this article are a
talk and an
article
by Uncle Bob Martin, but a lot has been written and spoken on the subject by a
lot of different people and you can find the links I find more relevant on the
bottom. They provide a good (mostly) theoretical overview of the problem and
solutions, whereas this post aims at proving a very concrete solution with code
samples in Ruby and Ruby on Rails, which is something I could not find anywhere.
The Basics
For those of you who don’t have the time to read the links, just want to brush
off on some of the basic concepts or for the sake of us being able to
communicate in the same vocabulary, let’s go ahead and define those concepts.
First off here’s a high level view of the clean architecture according to Uncle Bob:
As you can see there are different layers in the application, going inside out,
the first two are the core of the app, where all the business rules and objects
live. The other two are the “details”, the delivery mechanisms (in our case it
will be Ruby on Rails), the databases (in our case postgresql), etc…
Entities
Entities are business objects, functions or data structures, that are
responsible for all the non application specific business rules.
This means that if you have multiple applications that share the same domain
(business) objects, the entities should not need to change in order to be usable
by all of them.
Interactors or Use Cases
Interactors represent the layer for application specific business rules.
This is where most of the magic happens, they control the entire flow of the
application, using entities, but never changing them.
They should not, however, be affected by changes to the UI, whichever they may be.
Boundaries or Adapters
A boundary is the interface that translates information from the outside into
the format the application uses, as well as translating it back when the
information is going out.
These boundaries may not be explicit, so much as they are logical or conceptual.
In any case, they are there and you should be aware of it.
The Dependency Rule
This is the single most important concept, and you must always take it into consideration.
The dependency rule states that source code dependencies can only point inward.
There’s a generalization of the rule that applies to any application, source
code dependencies can only point in one direction.
Applying it to the Real World™
By now you should at least know why such an architecture is important, and the
main characters that come into play.
But, as I’ve said before, applying all of this into a real case scenario is what
you probably don’t know and/or are curious about.
Our approach
We have to start somewhere, and we want to start on the right path, the best way
I know how to do that is through a use-case & test driven approach.
I like this approach for two reasons:
We need tests to guide us and to provide confidence in the code base
Use-cases don’t let us stray from what brings value to the business
I’m not going to digress a lot into why TDD is awesome and you should do it,
since there are a lot of resources out there on the subject. I will say that
we’ll mostly be following Ian Cooper’s ideas on
testing, for which the gist is the trigger for a
new test should be a new use case, not a new class or method.
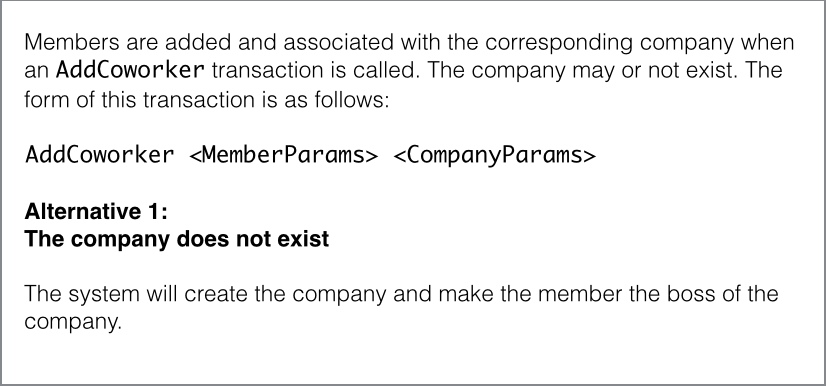
Notice that we have a main path and an alternative, which can also represent
what to do in case of error. Also, there is no reference to anything related to
the web, the use case level should be delivery mechanism agnostic. In other
words, it must work the same way regardless of being used on the web, desktop or
CLI.
The test
123456789101112
context"the company does not exist"doit"creates a member"do...adder=Coworkers::CoworkerAdder.newparams:params,space:default_spaceexpect{adder.add}.tochange{member_repo.all.size}.by(1)endend
Now we have a test for the behaviour we expect, we just need to let it guide us.
Side note: This test was not written all at once, I followed the three rules
of TDD to get
here.
The interactor
The code to make this test pass (minus the private methods) is as follows:
There are a lot of interesting bits of code in our interactor, and a lot of
decisions that were made. Let’s take a closer look at each of them.
Repositories (Gateways)
In order to abstract the persistence mechanism I decided to use the Repository
Pattern, in which we
have repositories for each type of persistence mechanism we want to use and that
can be used interchangeably.
Sounds a lot like an interface? Well, it is, kind of… In Ruby we don’t have
interfaces, we just go ahead an use what we call a duck type.
What’s really relevant here is the object’s public API, it’s interface, the
save(member), all, first and last methods, since they’re what defines a
valid repository for a member.
The Repo Boss
Someone, somewhere needs to know which repository to use for each entity or use
case (repositories do not need to exists in a 1-1 relation with entities, even
though most of the time they do). That someone is a very simple class I call
Repository, which tracks the registration of repositories:
As you might have guessed, we then need to register the repositories we want.
That is very simple and very easy to hide behind some sort of configuration, but
here’s how it’s done:
There might be ways of doing this that are more elegant or clever, you could,
for instance, extract common attributes such as id, created_at and
updated_at (or you could not even store them here, if you feel they are to
“railsy”). For now this approach will suffice, though.
Validations
On line 10 of the interactor you can see the method valid? being called on the
member entity. The easiest way I could think of to implement validations was
this:
As with any good engineering problem, there is no correct answer. There are
trade offs in both solutions, one may take longer to implement, but is small,
the other has everything you need and probably a bunch of other stuff as well.
Pick your poison.
Database dependent validations
What about validations that depend on the database, such as validating
uniqueness, you might ask. The easier way would be to add that validation on the
repository, but that would spread business rules for an entity across multiple
files and we don’t want that.
The solution we came up with is to have a generic unique? method on the
repository and calling in from the entity:
1234
defvalid?super&&repo.unique?(self,:name)end
The implementation of the unique? method for the in memory repository is as follows:
A very important part of this whole architecture is crossing layer boundaries,
especially the boundary that separates the application from the delivery
mechanism. You want to make sure not to pass entities around, since they come
with a bunch of business rules attached, instead you should pass value objects,
or plain data structures.
I prefer to pass data structures, but have the serialization from entity to data
abstracted on a method called value, which allows for the interactor to do
what it is doing on line 14:
1
member_repo.save(member).value
What does that value do, you might ask. It simply calls a serializer.
Serializers
The value of an entity can be defined as follows:
123
defvalueSerializers::Raw.new(self).serializeend
It takes an object (in this case an entity), and serializes it’s attributes,
which, by default, it assumes come from an attributes method. The serialize
method can handle both an hash with all the attributes, in which case it just
returns it, or an array with just their names, from where it can create the hash
with the names pointing to the values.
We’ve already talked about repositories and that they are duck types for a
gateway’s logical interface, you even saw an implementation in memory. But since
a very common pattern is to use Rails with ActiveRecord, I feel like I should
show how an AR implementation looks like.
There are a few things of note here. One of the most obvious is that we define
the “model”, i.e. the class that inherits from AR::Base, as an inner class of
the repository. We do this because we don’t (and shouldn’t) need to use it
anywhere else, in fact, all references to AR should be encapsulated by the AR
repository.
This leads us to the next thing of note, the fact that we do not return nor an
AR object, nor an AR relation. The interactor (which will be calling this) only
knows how to deal with entities, so we get the value from the AR object, using a
serializer, and wrap it in an entity. All references to AR are gone.
Connecting with Rails
Now we have a working application (hopefully), we just need a way to deliver it
to our clients. We can do that using a CLI, web app, desktop app, REST API, or
any other way we so choose. As an example I chose to deliver it as a Rails app.
There are basically two steps in making this work with a Rails app:
Deploy our core application as a gem
Require, configure and use it from the rails app
The gem
I’ll not get into details on how to create gem, as that goes way beyond the
scope of this article which is already extensive, there are just a few “tips” to
make it easier to use.
A good way to make your gem painless to use is to autoload most of the stuff
when it is required. So your main file should look somewhat like this:
I truly believe this is a great way to build applications, and even though some
of my solutions might have room for improvement, the overall architecture and
underlying ideas are very mature and should definitely be taken into
consideration.
Here’s a recap of the main ideas covered in this article:
The application should not depend on the delivery mechanism or database, those are details
The application’s functionality should be driven by use cases
The application’s design should be driven by tests
Everything that follows is a consequence of this.
A nice side effect of using this architecture is that there is no need to load
entire frameworks such as rails, or using a real database to run your unit tests
(you might want to do integration and system tests, but that’s for another day)
which means they are fast.
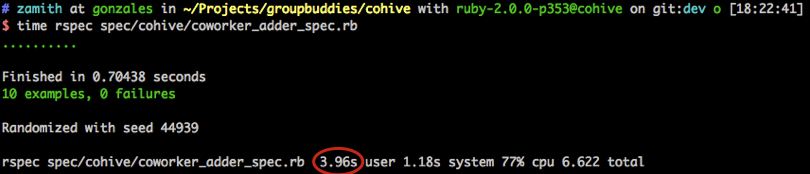
Here’s the tests for the service that does the same as the interactor, but from the rails app:
Notice that it takes 3.96s to run the tests. Now for the interactor with the clean architecture:
Notice that I’ve added more tests and yet it takes only 0.54s to run them all.
It’s an 86.4% improvement in testing time! When doing TDD you should be running
your test every 30s or so, that’s a gain of approximately 54 minutes per work
day.
It’s not that it’s hard to write tests, but they’re hard to get right. It all
starts with a little bit of tight coupling and a mock or two in the wrong place,
but it quickly scales to a huge and brittle test suite.
At this point your tests fail with every little change to the code base, they
take forever to run and the whole development team feels bad about them, blaming
them for every problem.
The first time you try to add TDD to your team’s process it is very easy to dig
yourself into this kind of hole, where your test suite adds no confidence,
design feedback nor team velocity. This will usually happen due to a lack of
understanding of the TDD philosophy and lack of experience writing tests.
Believe me, I’ve been there.
The worst thing you can do when facing such a situation is to blame it on TDD
and discard it completely. It is great and it definitely works, but if you have
no experience with it, you might want to ease your way into it.
So, let’s break TDD down into three major goals
Confidence in your system
Design feedback
Team velocity
The first we’ll try to get is confidence, then feedback and velocity will
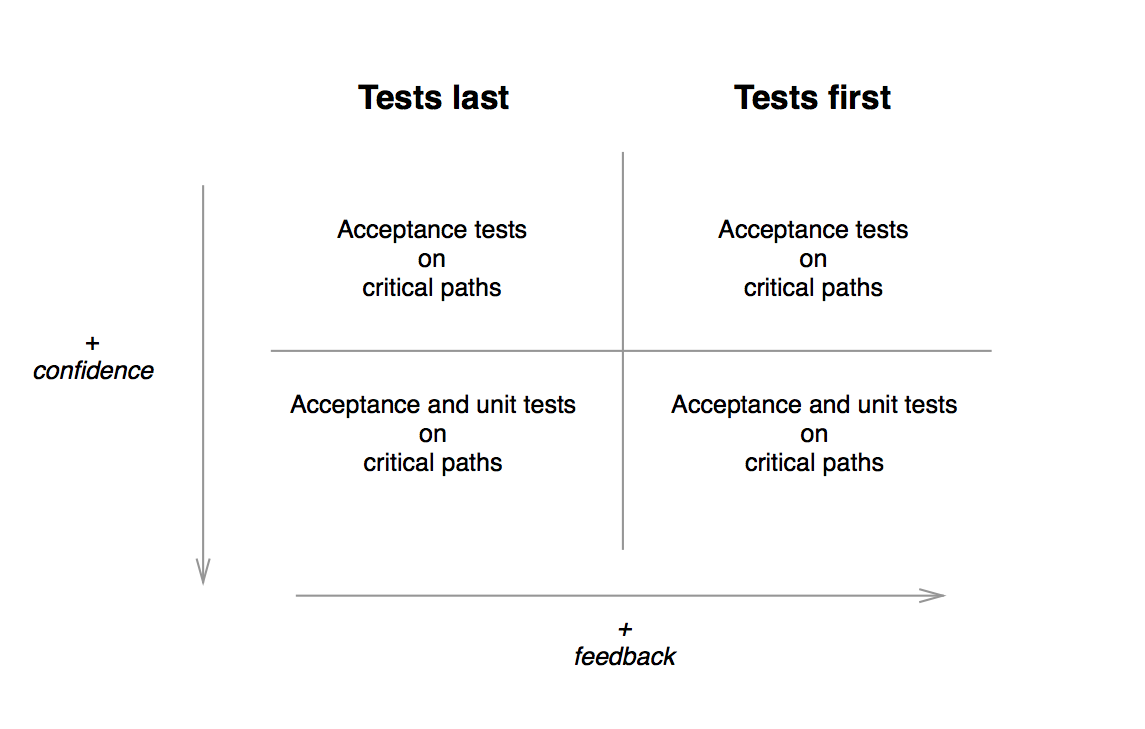
hopefully take care of itself. In order to do that, I came up with this chart:
The top left quadrant is the simplest to implement on a team, you do high level
acceptance or integration tests on the critical paths of your app, after the
features are written. The goal is that if any of these tests fails, you’re app is
not usable. This is a good way to start adding tests to an existing code base.
The bottom left quadrant builds on top of the first, but adds confidence by
adding some unit tests to critical algorithms in your app. The confidence you gain
is that if a big feature fails, you have a finer grained knowledge of where the
error might come from.
On the top right quadrant we start writing tests first, which will (if done
correctly) provide bigger design feedback and ultimately generate an overall
better code base. However, this is the time it starts to get harder, so your team will
really have to be on board with this, or else it just won’t work.
On the bottom right quadrant we are writing both acceptance/integration and
unit tests for the critical paths of our app before the code that makes them
pass (one test at the time, obviously), we are on a good way to having TDD at
it’s finest.
After you’ve nailed all of these quadrants, it’s time to go full blown TDD.
Takeaways
One thing to keep in mind though is that there is no silver bullet and this is
not a religion.
TDD works great in a lot of situations, but it may not be fit for others, just
give it a fair chance and weight the pros and cons on each situation. If after
that you feel TDD is slowing you down, consider dropping it.
I like to think of the observer pattern as dependency injection on steroids, the difference being that with
the latter (taking off from the example on the linked article) you need to call
the store method on the database, and therefore you must know there is one.
As with observers you don’t care if there is a database or not.
Here the database is observing the consumer, and when it has any new parsed
data, the DB gets notified and acts accordingly. If there is no database, the
consumer goes on with it’s business and nothing else happens, but there can be
one, two or more databases, loggers, etc, listening and performing actions when the
data is parsed.
Observer is a library that comes bundled with ruby, but there are others you can
use, such as:
The observer pattern is to a certain extent similar to javascript’s events and as
them, it can make your code really hard to understand and even debug, but used at
the correct time and place is a very powerful tool. Use it wisely.