There is (at least) one big problem with this approach, and it will manifest
itself when you want to support another data format, such as JSON. The Consumer
class is tightly coupled with the XMLParser, and therefore it’s hard to add
other parsers, so we need to decouple them. We’re
going to do that using a technique called Dependency Injection, like so:
This way we can inject the parser on initialization, or even after that. Note
that we have a default which is the XMLParser, but it is not mandatory to have a
default value.
So, after the refactoring, adding a JSONParser is easy.
Lately I came to realise that one of the most important things in a team’s
development process is good documentation of what everyone’s been doing.
If you know me well enough you’ll know that I hate documentation, which seems
rather contradictory, but I think it all boils down to what good documentation
means.
Good documentation, in my opinion, are not wikis, a bunch of shared documents,
progress reports, etc… That’s management crap. All a development team needs is
a commit history with good commit messages.
Note: I’m using git and git nomenclature as an example, but this applies to any
versioning system.
Commit Message Example
Here’s an example of what I consider a good enough commit message. It is
composed of three parts:
A first line of no more than 80 characters that sums up the purpose of the
commit
One or two paragraphs to explain the changes from a user point of view (user
story if available)
A bullet list of technical modifications of note
Integration into the flow
If you follow a flow that’s similar to
mine, you
don’t need to worry about writing this messages in every commit, since that
would be tedious.
What I do is, when on a topic/feature branch I commit at will, with any message
I see fit at the moment. This well written message comes only when creating a
pull-request, so that someone doing a code review can better understand the
changes.
Conclusion
This way of doing commits, in my opinion, make it really nice to read through
the git log of summaries, and when in doubt of what a commit does, it’s easy to
get more info, providing a nice way of developing as a team. Although it’s also
a reminder of why something was done that way, for when you’re looking at the
code some time later.
Yes, you read the title correctly, this is indeed a article about better
understanding the heart in order to become a better doctor. Of course that by
heart I mean testing and by doctor I mean developer.
The analogy is not that absurd, as matter of fact it is not absurd at all in my
opinion, as tests are the core of any application, especially one for the web.
Without tests an application won’t live long, it will probably be able to stay
alive for a while, but at the first need for change or growth, it will fester
and die. As a developer I much prefer not being around when such things happen,
and most of all I believe it is my duty to impede this from happening, it’s the
developer’s code of honour, it’s the reason I call myself a professional
developer.
As you can see I do have a very strong opinion on this subject, and I really am
suggesting that if your writing a web application without tests (preferably TDD
but not necessarily) you’re not only doing it wrong, but you’re being
unprofessional and utterly irresponsible. Plainly put, you should not be writing
code!
A little side note here to all of those starting in this business or that just
now have been introduced to testing, this article should be a good starting
point on your quest to a brighter future where tests lead the way. Moreover, you
should not include yourself in the group of irresponsible developers out there,
if you actually start testing, obviously. Testing is something that is rarely
introduced in CS majors and most starting developers don’t get to have an older
and more experienced mentor to teach them this stuff, so it’s really not your
fault and you have all my respect and appreciation for trying to learn this.
Also, not everyone has to be a professional developer, and that’s fine. Just
don’t try to impersonate one, that’s all I’m asking.
Now that we’re done with the contextualization let’s get to the juicy part of
the article, where I’ll introduce some basic concepts and keywords of testing (some
of which you might have already heard of) and slowly progress into more advanced
and “philosophical” ones.
The religions
TDD, BDD and traditional testing. This are the most adopted religions in the
testing community.
You’ll often see them referred to as methodologies, processes or even
philosophies, but I believe they’re more than that. As a developer this will
drive not only your code but also the way you think and solve problems. It’s a
way of life, so choose carefully and embrace it (well, maybe I’m being a bit
dramatic here, you can change your mind afterwards, trying to mix them too much
is ill advised, though).
TDD
Test driven development, as the name states, is when you let your tests drive
your application’s code. It is often coupled with an agile software development
process, as it too work in very short cycles composed of three phases:
Red - You make a test for a feature you wish you had (usually it will test a
very specific part of that feature)
Green - You write only enough code to make the test pass, not more, not less
(at this point you should commit your work)
Refactor - You are now in a green field, where you have a solution that may
not be optimal but it works and a test to make sure that it ever stops
working you’ll know about it. This is the perfect time to think of a better
way of solving the problem
This is the core of TDD, it states that if you repeat this cycle over and over
again you’ll have smaller and more focused classes, looser
coupling and
cleaner interfaces.
There is, AFAIK, no real proof of this, but TDD does provide you a great test
suite, which combined with a control version system gives you much more
confidence in your code, as well as more freedom to change things and an easier
way to debug regressions also, (and some might argue this is the greatest
benefit of TDD) if done right, you get documentation for free.
TDD can actually be divided into two subgroups, according to Martin Fowler, the
classical and the mockists, but we’ll get to that later on.
Right about now you should be wondering, “if TDD is so great, why even bother
having other ways of testing?”. It turns out that TDD is not perfect, mostly due
to our own faults as developers, such as the tests failing to cover an important
edge case or the tests being badly written leaving us a bigger code base to
maintain. Another problem might be that we as overzealous as we are, try to test
every possible scenario for every little bit of code, this is counter productive
and to know what and how much to test is a kind of art that will come with
experience (we’ll cover some ground rules that make this an easier task,
though).
When doing TDD (or any kind of tests) there is one thing you should be
constantly aware of, “your code is NOT bug free!”. Rest assured, bugs will
appear, but they will probably not be on your main flow of things, and when
they’re fixed, they’ll stay fixed.
You are not allowed to write any production code unless it is to make a
failing unit test pass.
You are not allowed to write any more of a unit test than is sufficient to
fail; and compilation failures are failures.
You are not allowed to write any more production code than is sufficient to
pass the one failing unit test.
One of, if not the most important thing in TDD is that you write your own tests.
I like to go a bit further and say that the tests are part of the code.
BDD
Behaviour Driven Development is largely based on TDD, it differs mainly in the
fact that it focus in the behaviour of things instead of how they work, which is
why BDD always starts by defining a scenario. Plainly put, you focus primarily
on the user interaction and the user’s point of view.
For instance, imagine you would like to implement and ATM, with TDD you would
probably start by testing if the withdrawal and card validation mechanisms,
whereas with BDD you would write a scenario such as this:
Scenario 1: Account is in credit
1234567
Given the account is in creditAnd the card is validAnd the dispenser contains cashWhen the customer requests cashThen ensure the account is debitedAnd ensure cash is dispensedAnd ensure the card is returned
Almost everything else in TDD will also apply here, but this small change in
perspective will have a deep impact in the resulting solution.
This type of scenarios have some rules, though, they have a special syntax so
that they can be understood by the non-technical people of the team or company,
but also so that they can be automated. As a matter of fact, doing this you have
not only a test suite, but also a pretty good documentation and feature
specification.
When writing scenarios I tend to prefer to write them declarative as opposed to
imperative, as I feel that otherwise it would pretty much defeat the whole
purpose of writing them. Here’s a pretty good take on the differences
If you ever tried TDD you probably have faced the “what do I test first”
situation, BDD sets to solve that as you always start with the scenario and let
it drive you. In the example above you would first write a failing test that
would check that the account has credit, and then make pass, then you would
write a failing test for the card validation and make it pass, and so on. Bare
in mind though that making these tests pass may require going to different
layers of the application and further testing, but you’ll always know what to
test first.
BDD is more elegantly described by it’s creator Dan North from whom I took the
ATM example in this article.
Traditional Testing
I call this traditional testing for the lack of a better term, but this is the
model you’ll see in companies that adopt very strict development methodologies
such as waterfall or
RUP, and it happens
when there is an entire team whose only purpose in life is to do write tests.
In this model the tests start to be written after the development is complete,
IMHO it some serious drawbacks (even though I’ve never personally used it, I
must admit):
The tests and it’s expectations don’t drive the code and the probability of
having poorly written, extremely coupled code is much higher
Management is always pushing for deliverables and/or deploys, in the event of
delays the test phase will be the first to suffer the consequences
Even if the test process starts in sync with development process it is harder
and less productive to have someone else write the tests for your code as you’re
writing it.
In case you haven’t yet figured out, I’m nor a big fan, nor a big connoisseur of
this type of testing, still I did not want to go by without mentioning the ways
of the past.
Going a bit further into TDD
The main focus of the rest of this article is going to be TDD with Rails, but as
I’ve said earlier TDD has two subgroups, from which I’ll choose one (not 100%,
but almost) and even borrow a few high level concepts from BDD.
Classical TDD
When writing tests, classical TDDers will not use mocks and use stubs as little
as possible, mostly to fake web services and the such. They focus entirely on
the final state of the system, in the ATM example, they would test that the machine
has given money to the user, for example.
In this approach the tests for an object will test it’s functionality as well
as it’s neighbours’.
Mockist TDD
Mockist TDDers will use mocks to filters everything that is not the SUT (System
Under Test). Taking the ATM example one more time and imagining the SUT is the
card validator, they would test that if the card is valid, the
give_money_to_user method was called on the money dispenser. The focus here is
on behaviour instead of state.
In this approach the tests for an object will test it’s functionality as well
as it’s communication with it’s neighbours.
Check out Martin Fowler’s
article on this for a
much more in depth analysis of the difference between classical and mockists
TDDers, as well as the difference between mocks and stubs.
Outside-in testing
Outside-in testing is a process that goes pretty much hand in hand with BDD in
terms of where it begins. When doing this we start by writing an integration or
acceptance test (this could be a BDD scenario), and go from there.
The main purpose here is to let the code be driven by the feature the clients
actually want, so you don’t start coding away before having a good grasp on how
the user experience is going to be.
This process plays well with both BDD and TDD, it’s really up to you which
religion to live by. I tend to prefer the mockist TDD approach, which is kind of
a hybrid, and I’ll explain in full detail how to do it in a Rails app.
Another way of doing tests would be to start by the core classes of your system,
and work your way to the layers, such as UI and database. In Rails this would
translate to first write tests and respective code for the most important models
and controllers, and they work your way to migration, validations, etc, as well
as the views.
I’ve taken this approach several times and discourage you from doing so, because
this will probably lead to adding too much features to your system, and make the
final system to not accurately represent the clients wishes.
Final Notes
I believe we covered a lot of ground here, there is however, a lot more you can
do to become a more proficient tester and therefore a better developer.
In my opinion you should really focus on two things if you indeed intend to
improve your code’s quality through testing, write and read, simple as that.
You should definitely write a lot of tests so you can face the problems, and
have your own doubts. That’s how you learn any programming language, principle
or methodology, by hitting your head on the wall until you realize there’s a
door right beside you.
You should also read a lot, so that that door becomes easier to find and open.
Throughout the article I’ve provide some links you should really go ahead and
read if you haven’t done so already, but I’ll leave some more extensive reading
material (and some screencasts) I recommend.
A big issue with doing TDD is having fast test, or else running your tests will slow down your development cycle. One thing I always try to do is hit the database as less as possible, since what your testing is almost never directly related to the database itself.
This is easy enough to do by stubbing out the calls to model or ActiveRecord code. On a real application though, you’ll usually have to authenticate users and/or do some kind of authorization. This too should not have to go through the database.
For authentication I’m using Devise and for authorization CanCan, and setting up a controller test on RSpec goes somewhat like this:
it"does something"docontroller_full_setup@ability.can:do,:action# rest of the testend
With this setup you are logged in to devise as a user, and have a blank cancan ability object in which you can define the abilities needed for the purpose of the test.
I’ve talked about turbolinks before, and it is awesome. Integrating it with jquery plugins or legacy code could be quite a pain, so jquery.turbolinks came to be.
It’s a pretty simple plugin that stores each callback you had on DOM ready and runs it on page:change, the turbolinks event.
So, you might think all your problems are solved, but it is not quite so. What if you want to run some code just for a specific page? Or include a file for a specific page?
Using turbolinks render the usage of stuff like content_for :head impossible, as the head will already be on cache, and the code you added to it will not run.
And if you try to add the code in the body, jquery.turbolinks will add the callback each time you go to the page, which means that if you visit the same page twice before a full page refresh, your code will also run twice. Not very good…
Rails 3.1 asset pipeline
The asset pipeline has three goals, precompile, concatenate and minify.
So, even though the rails generators create a .coffee file for each controller, the normal usage would be to have all of them concatenated into one, when in production. This file will be loaded on the home page and can be cached the rest of the way.
There are obviously some times when we might want to add some files in other places than the home page. For that we’ll have to create a new manifest files and explicitly tell rails to add it to the precompile path. A common usage for this is to have a footer.js manifest for files that are loaded after the rest of the body.
If we want to add such manifests to the body, using turbolinks and jquery.turbolinks, we’ll have the same problems if the code is actually trying to run code, and not just defining functions and variables.
The pipeline trap
A problem with having all you’re files concatenated is that you have to be extra careful with when and where you attach event listeners. For instance, if you attach an event to an li in the posts.coffee file, and it is then included in the application.js manifest, all the li’s in your application will have that listener.
There are two ways (that I know of) of solving this problem.
You can either add a class or id to the body element of each page, such as posts_index and then attach the listeners to the li’s only when the body has that attribute.
You need to export the functions because coffeescript will not let functions and variables defined in a file pollute the global scope, and the easiest way to do it a browser is to attach them to the window object which is always present. We add an exports namespace so that the window namespace will not be polluted with all our functions, but it would work even without it.
I tend to prefer the second approach for two reasons. First, and even though it adds JavaScript to the body, it is less obtrusive. And second, because it integrates with turbolinks, as it does not assume the code in the head is run every time.
The Turbolinks Problem
We still have a problem, though. Code that’s in the body running more than once.
The easier way I found of solve this was to use the once function from the underscore library. Obviously I was already using underscore for other stuff, or else it would be a complete overkill. If you just need this one function, define it somewhere that gets concatenated into your application.js file.
So, calling the function I defined above would look like this:
Given that you have used Rails for a medium sized project, or that you are zealous with your queries to the database, you’ve probably heard of activerecord’s includes method to eager load relations in order to prevent the N+1 query problem.
Don’t fret if you haven’t, I’ll break it down for you. Imagine you have a Post model which may have one or more Comment, and that in your view you do something of the sort (assuming @posts = Post.all):
In this snippet, a query for fetching the comments is being performed for each post, so it’s N for N equal to the number of posts plus 1 queries to list the posts. For a big number of posts you’ll swamp your database.
In order to prevent this you can do @posts = Post.includes(:comments).all that will eager load all the comments of all the posts and store them in memory, so when you try to access them you don’t hit the database.
Nested Eager Loading
A feature that I find rather undocumented is that it is possible to eager load a relation of an object you’re eager loading, such as the author of a comment if you wanted to access it’s name or avatar, for example.
That can be achieved by passing an Hash as an argument to the includes method instead of a Symbol, for the example above it would be, @posts = Post.includes(comments: :author).all.
I have tried it to three levels of nesting which is already more than you should ever need, still it can go deeper than that, not sure how much deeper, though.
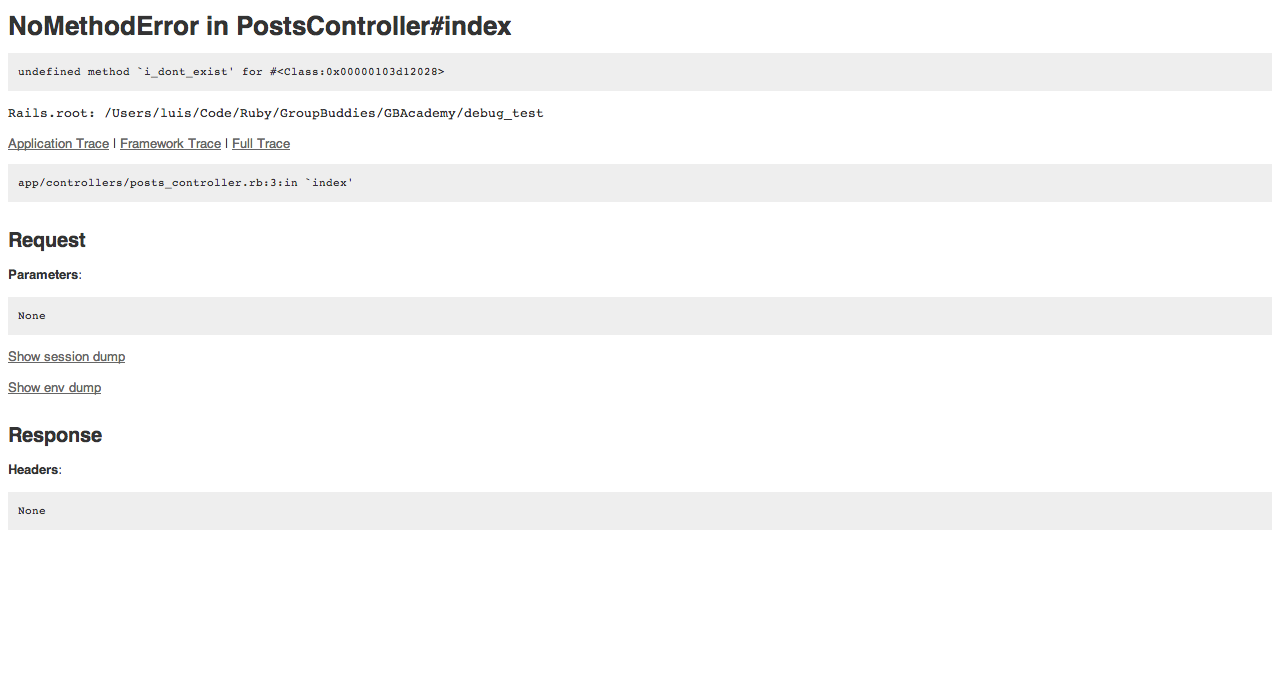
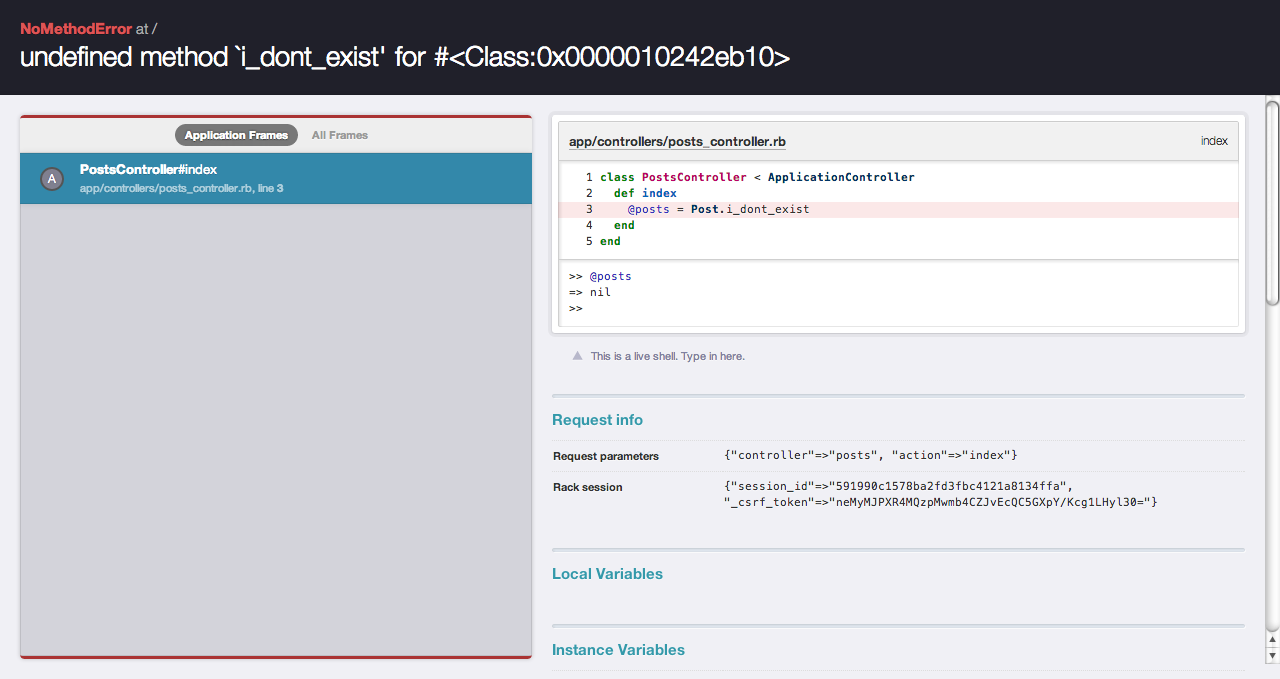
There are many ways in which you can debug your Rails applications, I’m going to show you how to display the errors you get in a nice way, using Better Errors, and what to do when that just isn’t enough.
Better Errors
This was covered in great depth by Ryan Bates in a RailsCasts #402. After you install the gem, when you get an application error instead of this:
You’ll be prompted with something like this:
Note that by adding binding_of_caller gem you’ll also have a REPL on the point of failure.
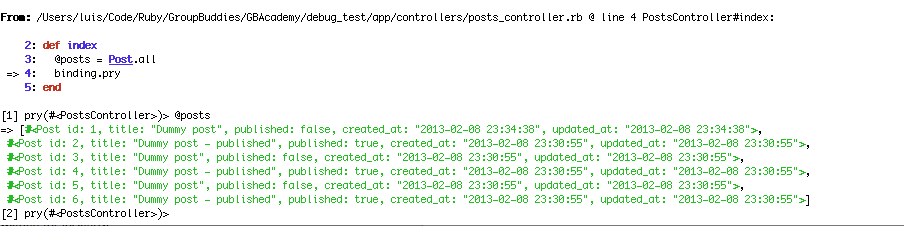
Pry
Better errors with a REPL is going to take care of most of your problems when doing a full stack request, but if you are developing some model classes or even some libraries in Rails or plain old Ruby, you may want to declare breakpoints so you can do some debugging.
Debbuging with pry is as easy as droping the binding.pry line wherever you want the breakpoint, like so:
When running this code, your server will stop at the breakpoint and you should see this:
This has been covered on RailsCasts #280. One thing Ryan doesn’t mention though is the pry-rails gem, which will sub in as your rails console and give you some nicities as showing routes and the schema for a given model in a good looking way.
$railsconsole[1]pry(main)>show-routespokemonPOST/pokemon(.:format) pokemons#create new_pokemon GET /pokemon/new(.:format)pokemons#newedit_pokemonGET/pokemon/edit(.:format)pokemons#editGET/pokemon(.:format) pokemons#show PUT /pokemon(.:format)pokemons#updateDELETE/pokemon(.:format) pokemons#destroy beer POST /beer(.:format)beers#createnew_beerGET/beer/new(.:format)beers#newedit_beerGET/beer/edit(.:format)beers#editGET/beer(.:format) beers#show PUT /beer(.:format)beers#updateDELETE/beer(.:format) beers#destroy[2] pry(main)> show-routes --grep beer beer POST /beer(.:format)beers#createnew_beerGET/beer/new(.:format)beers#newedit_beerGET/beer/edit(.:format)beers#editGET/beer(.:format) beers#show PUT /beer(.:format)beers#updateDELETE/beer(.:format) beers#destroy[3] pry(main)> show-routes --grep new new_pokemon GET /pokemon/new(.:format)pokemons#newnew_beerGET/beer/new(.:format)beers#new[4]pry(main)>show-modelsBeerid:integername:stringtype:stringrating:integeribu:integerabv:integercreated_at:datetimeupdated_at:datetimebelongs_tohackerHackerid:integersocial_ability:integercreated_at:datetimeupdated_at:datetimehas_manypokemonshas_manybeersPokemonid:integername:stringcaught:binaryspecies:stringabilities:stringcreated_at:datetimeupdated_at:datetimebelongs_tohackerhas_manybeersthroughhacker$DISABLE_PRY_RAILS=1railsconsoleirb(main):001:0>